Introduction
Pre-event prepartion
Step 0.1: Install git version control software
- Navigate to the official git website and follow the instructions to download and install for your operating system.
- For Windows, use this download link and install using all of the default (recommended) options.
Step 0.2: Install and configure GitHub Desktop
- Navigate to Github and sign up for an account (if you don’t already have one).
- After registering, sign in to your account.
- Watch the short introductory videoWhat is GitHub?.
- If using a Windows or Mac, download and install GitHub Desktop
- More guidance can be found in guides from GitHub and TechRepublic.
- Sign into GitHub Desktop using your GitHub credentials
- In the Configure Git page, enter the name and email address that you want associated with your changes
- In File > Options > Advanced, set the Shell to Git Bash
- (optional) Once configured, the main GitHub Desktop page will show any repositories that exist in your GitHub account. For those who use git already, you can add any local repositories that already exist on your machine.
Step 0.3: Install Openrefine
- Navigate to this setup page and follow instructions for installing the Openrefine software. NOTE that you do not need to download the data file, as we’ll be retrieving it in the workshop session using GitHub.
In-Class Activity
Introduction
Follow along with the introductory slides.
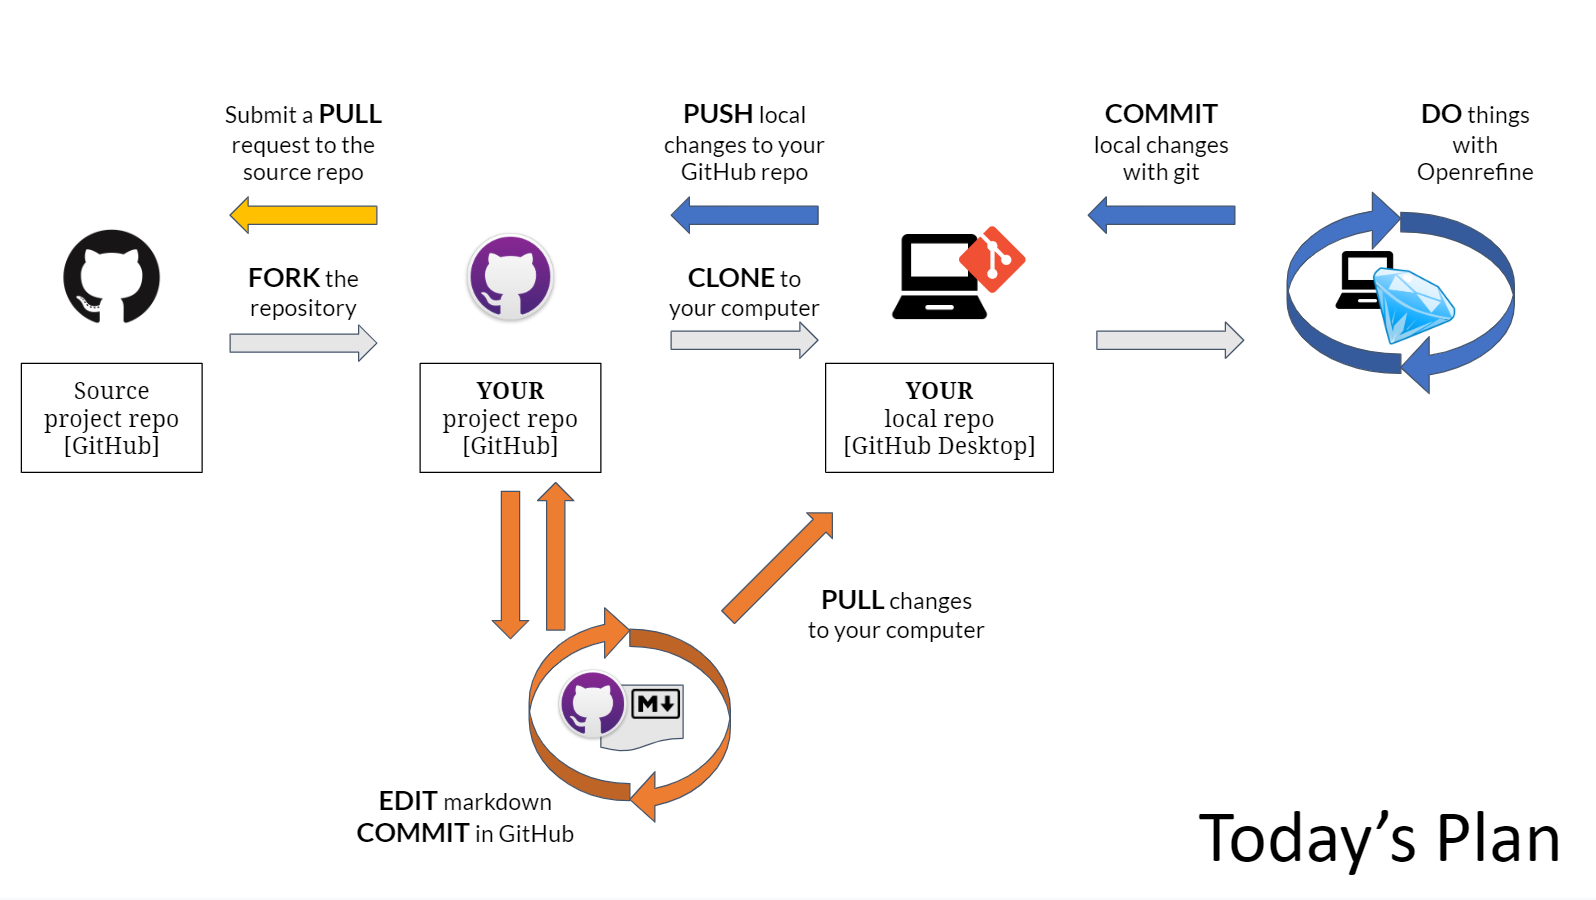
During today’s workshop, you will accomplish the following tasks:
- Use GitHub to fork someone else’s project into your own GitHub repository
- Use GitHub Desktop (GHD) and git to clone your repository to your local computer
- Use Openrefine to clean some messy data, and edit the contents of your local repository (by exporting a processing script and refined data products to your working folder)
- Add and commit your changes to your local git repository
- Push your changes from your local computer to your GitHub repository using GHD
- Edit content (i.e. Markdown files) using the GitHub web interface
- Pull new changes back to your local repository
- Initiate a ‘pull request’ to the original project repository
For Windows and Mac users
Step 1.1: Fork a GitHub repository
In this step, you will ‘fork’ an existing (original) GitHub repository (belonging to someone else) to create a branch repository in your GitHub account. This allows you to create a copy of the original repository that you can modify as desired…and perhaps, allow your changes to be merged back ‘upstream’ to the original repository.
- Ensure that you are logged into your GitHub account.
- Navigate to the workshop GitHub repository https://github.com/data-curation/cdcf-workshop2A.
- Click the Fork button at the top of the repository–this will “fork” the repository and create a branch in your GitHub account. By default, it will use a similar URL naming convention to the original (i.e. https://github.com/
/cdcf-workshop2A).
Step 1.2: Clone to your local computer
In this next step, you will ‘clone’ your GitHub repository to your local computer so that you can work on files locally.
- In GitHub Desktop, your newly forked repository should appear in the Your repositories list (You may need to refresh the list for it to show).
- NOTE: If it doesn’t appear, double-check that the repository exists in your GitHub profile. If it does exist, you can copy the repository URL from GitHub and paste it into the appropriate place using the “Clone a repository from the Internet” button on GitHub Desktop.
- Highlight your repository in the list and click “Clone <repository name>”. Select the local path where you would like to download the repository–a new folder will be created with the name of the repository.
Step 1.3: Do things in Openrefine!
- Once you’ve cloned the repository, use the button on GitHub Desktop to view the repository/files in Explorer.
- Proceed with the Data Carpentries Openrefine lesson, using the downloaded data.
Step 1.4: Export/Save modified data and processing script from Openrefine
- Be sure to save all exported products (processing script, tar.gz project file, csv file) in the folder you cloned in Step 2.
Step 1.5: Add and commit new files and changes to your local repository
- Maximize (or reopen) GitHub Desktop and open the local repository for this workshop (\cdcf-workshop2A).
- The modified files will appear in the left-hand pane. Clicking on any of these files will display changes in the main pane.
- To commit changes, add a short summary (e.g. “outputs from OpenRefine workshop”) and a further description of contents and activities (if desired). Click Commit to master.
Step 1.6: Push changes to your GitHub repository
- The repository overview page in GitHub Desktop will now display a new message: Push 1 commit to the origin remote. Click to push changes to the origin remote in GitHub.
Step 1.7: View and edit your readme file in the GitHub Editor
- Once your changes have been pushed to your remote (GitHub) repository, use your web browser to navigate to your GitHub repository. Confirm that the new files have been added to the repository along with the timestamp and summary from the commit.
- Explore the files in your GitHub repository. View the exported csv file, which will be presented in a formatted table.
- View the README.md file and open it up for editing by clicking the pencil icon (“Edit this file”)
- The README file is written in Markdown, a lightweight markup language that allows you to use plain text and a few special characters to create formatted text.
- More information and references for Markdown:
- Edit the readme file to include pertinent information about the repository’s creation, its contents, and sharing information. An empty template has been created for you from Cornell University’s Guide to writing “readme” style metadata. Click the Preview changes tab to see how the Markdown will render on the web.
- When finished editing, scroll to the bottom of the page, add a Summary and Description and commit changes to the master branch.
Step 1.8: Pull GitHub changes to your local repository
- Maximize GitHub Desktop and click “Fetch origin” near the top of the window. A new prompt should appear to “Pull 1 commit from the origin remote”. Click Pull origin to incorporate the changes into your local repository.
- Inspect the changes to your local repository.
Step 1.9: Make a Pull Request to the original repository
On occasion, you may want to ask the maintainer of an ‘upstream’ branch to incorporate your changes. This can be done by making a Pull request
- From the top-level page of your GitHub repository (i.e. /cdcf-workshop2A), click on New pull request. You’ll be taken to a page that compares the differences between the two repositories. Review the suggested changes and click Create pull request.
- Add a title and leave a comment. and click Create pull request.
- Your pull request will now appear in the upstream repository’s list of requests. The owner of the upstream repository can now manage the merger of files (either automatically or manually).
For Linux users
Step 1.0: Configuring your git account
Open up Git Bash and navigate to the desired directory for your repository
- Set your name:
git config --global user.name "John Doe" - Set your email address:
git config --global user.email johndoe@example.com - Check your settings
git config --listSee git documentation for more information.
Step 1.1: Fork a GitHub repository
In this step, you will ‘fork’ an existing (original) GitHub repository (belonging to someone else) to create a branch repository in your GitHub account. This allows you to create a copy of the original repository that you can modify as desired…and perhaps, allow your changes to be merged back ‘upstream’ to the original repository.
- Ensure that you are logged into your GitHub account.
- Navigate to the workshop GitHub repository https://github.com/data-curation/cdcf-workshop2A.
- Click the Fork button at the top of the repository–this will “fork” the repository and create a branch in your GitHub account. By default, it will use a similar URL naming convention to the original (i.e. https://github.com/
/cdcf-workshop2A).
Step 1.2: Clone to your local computer
In this next step, you will ‘clone’ your GitHub repository to your local computer so that you can work on files locally.
- In the top-level page of your newly-forked GitHub repository (i.e. /cdcf-workshop2A), click on the Clone or Download button. Copy the URL that is provided.
- Open Git Bash in the desired directory for your repository. Enter the command:
git clone <copied url> - Git should now download the contents of your GitHub repository to a new folder in your current directory
Step 1.3: Do things in Openrefine!
- Once you’ve cloned the repository, use the button on GitHub Desktop to view the repository/files in Explorer.
- Proceed with the Data Carpentries Openrefine lesson, using the downloaded data.
Step 1.4: Export/Save modified data and processing script from Openrefine
- Be sure to save all exported products (processing script, tar.gz project file, csv file) in the folder you cloned in Step 2.
Step 1.5: Add and commit new files and changes to your local repository
- Check the status of your repository (i.e. what’s been modified):
git status- This will provide a list of items that are not yet being tracked (i.e. have not been added to the index), and those that are being tracked and have been modified.
- Add new items to the list of tracked files (individually):
git add <filename>- OR Add all items to this list of tracked files:
git add --all
- OR Add all items to this list of tracked files:
- Commit changes to git (i.e. record changes):
git commit -m '<enter a note on what has changed>'- OR add and commit all at once:
git commit -a -m '<enter a note on what has changed>'
- OR add and commit all at once:
Step 1.6: Push changes to your GitHub repository
- To check if there are connected remote repositories use the command:
git remote -v - Push changes to the target Github repository using the command:
git push origin master- In this example – which is the default case – origin specifies the remote (i.e. Github) repository that is the target of your ‘push’. master specifies the branch of the git repository that you’re working on as the source data.
Step 1.7: View and edit your readme file in the GitHub Editor
- Once your changes have been pushed to your remote (GitHub) repository, use your web browser to navigate to your GitHub repository. Confirm that the new files have been added to the repository along with the timestamp and summary from the commit.
- Explore the files in your GitHub repository. View the exported csv file, which will be presented in a formatted table.
- View the README.md file and open it up for editing by clicking the pencil icon (“Edit this file”)
- The README file is written in Markdown, a lightweight markup language that allows you to use plain text and a few special characters to create formatted text.
- More information and references for Markdown:
- Edit the readme file to include pertinent information about the repository’s creation, its contents, and sharing information. An empty template has been created for you from Cornell University’s Guide to writing “readme” style metadata. Click the Preview changes tab to see how the Markdown will render on the web.
- When finished editing, scroll to the bottom of the page, add a Summary and Description and commit changes to the master branch.
Step 1.8: Pull GitHub changes to your local repository
- You can check changes (before merging them) with:
git fetchgit diff origin master - Pull (fetch and merge) changes:
git pull origin master- Note:
git pullactually runs two processes:fetch(get changes) andmerge(place in your directory)
- Note:
- Inspect the changes to your local repository.
Step 1.9: Make a Pull Request to the original repository
On occasion, you may want to ask the maintainer of an ‘upstream’ branch to incorporate your changes. This can be done by making a Pull request
- From the top-level page of your GitHub repository (i.e. /cdcf-workshop2A), click on New pull request. You’ll be taken to a page that compares the differences between the two repositories. Review the suggested changes and click Create pull request.
- Add a title and leave a comment. and click Create pull request.
- Your pull request will now appear in the upstream repository’s list of requests. The owner of the upstream repository can now manage the merger of files (either automatically or manually).
More information
git
Markdown
What is Markdown?
Borrowed shamelessly from Github’s Mastering Markdown page:
Markdown is a way to style text on the web. You control the display of the document; formatting words as bold or italic, adding images, and creating lists are just a few of the things we can do with Markdown. Mostly, Markdown is just regular text with a few non-alphabetic characters thrown in, like # or *.
Markdown uses simple notation to apply simple formatting rules. Since it’s pretty much just plain text, it’s transferrable and much simpler than marked-up text like HTML or even Word or Google documents. For much of the writing that you do for the web, Markdown is good enough. Github uses Markdown for its documents (this document was created in markdown), as does a variety of other web platforms (Trello, for example).
Using Markdown in Github lets you create readme files that can use better formatting than a plain text file, but is still readable as plain text – it’s the best of both worlds.